Learning HTML Part Three
Picking up from where part deux left off, this post will talk about links and images in HTML pages. This series is meant to document some of my learning, not be a complete reference material.
Links
Links are primarily displayed on a page using the a or anchor tag. An example of an absolute link is the below to the Mozilla Developer Network site:
<a href="https://developer.mozilla.org/en-US/">MDN</a>
This will display a clickable link on the page that says MDN and goes to https://developer.mozilla.org/en-US/. Absolute links are primarily used to link to external documents or material.
Alternatively, a relative link is used to link to a document that exists locally to the current document.
<a href="about.html">Rob Mengert</a>
The above link will open about.html, which exists in the same directory on the server as the current page being displayed. Relative links are handy to display a different page from the same site.
The last type of link I’ll mention is an internal link.
<!-- The 'href' here must match an id tag elsewhere in the document -->
<a href="#html">HTML</a>

<!-- And here it is -->
<section id="html">
Clicking on the link that has the text ‘HTML’ will bring the user to the place on the page where this section begins. There are other link types that are used, but this seems like the big three.
Images
Images are ubiquitous throughout the web, and this section will talk about lessons learned. Images are embedded using the img tag, and the first thing that jumps out is that a closing tag is not required. Let’s look at an example:
<img src="img/caribbean.jpg" alt="Caribbean beach" title="I want to visit a Caribbean beach" width="400" height="225" loading="lazy">
The first attribute in the img tag is src. This tells HTML where the image is, and it can be either an absolute or relative link. In the case of an absolute link, an image can be pulled in from anywhere on the internet. Like any absolute link, you must be mindful that the destination could change or be brought down in some way by the owner of the other site, thus breaking the link on your site.
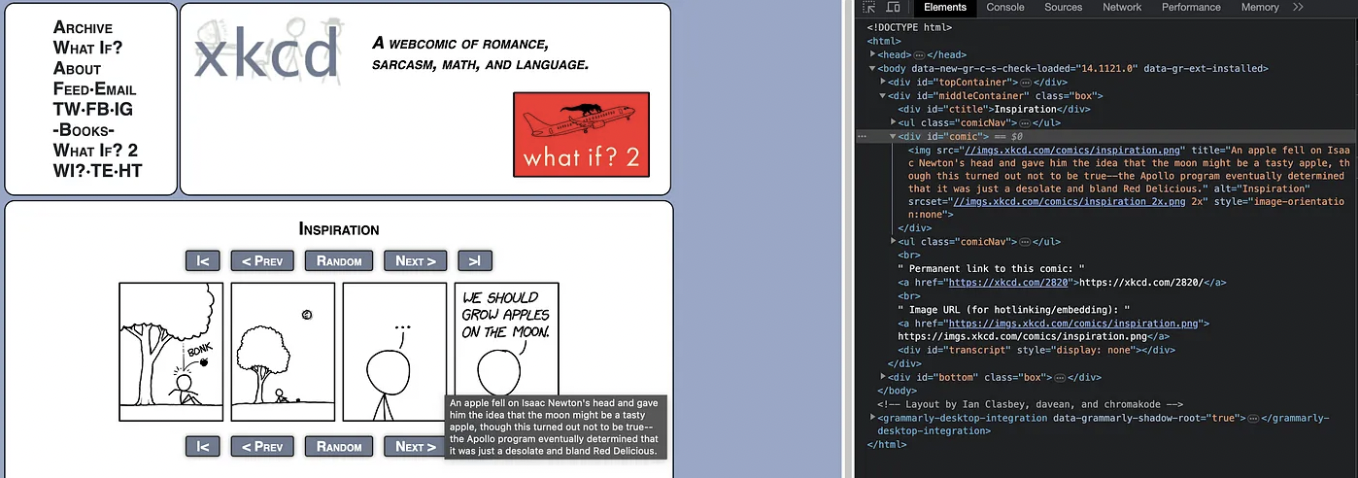
The title attribute is used to provide additional context about an image. This text is displayed when the mouse hovers over an image. For fans of the great webcomic XKCD, the mouseover text is embedded in the title attribute of the comic image:

The alt attribute serves a couple of different purposes. First, it makes the image accessible to folks who are visually impaired by providing a description of the image. Screen readers will read this text to them.
This text also helps with search engine optimization or SEO. The web spiders for search engines will read the text in this attribute to gain an understanding of what is in the picture.
The use of the alt attribute is fallback text. If, for some reason, the image cannot be displayed, this is the text that will be shown in the browser.
The height and width attributes are self-explanatory: they represent the height and width of the image in pixels. They can also be specified using percentages, which helps the images be responsive to a wider range of device form factors.
The last attribute used in this example is loading, and this determines how the image is loaded onto the page. If a page is long and an image exists near the bottom of the page, setting this attribute to lazy will tell the browser not to contact the server to get the image until the user is close to the bottom. The other option for this attribute is eager, which means that the image should be loaded immediately when a user visits a site. This can help improve the performance of your site by only loading the big assets onto the page when they are needed.
Wrap Up
Thanks for reading! Next time I’m going to write about how to use input forms.